Citrus Rainbow Carrots

One of my family's favorite vegetables are carrots. I have attempted to grow them for several years but have only been marginally successful due to the rabbits and the deer. Thankfully I am surrounded by farms and they always have a nice variety.


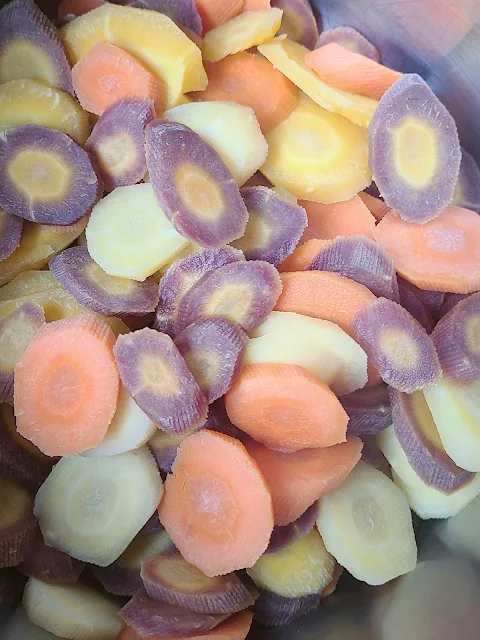
This recipe is from one of my fellow Taste of Home Community Cooks, Sue G. It starts by peeling and slicing the carrots and then boiling them for about 9 minutes.  


While they are doing their thing, you put the glaze together.  I love how it uses ingredients that I always have on hand, butter, sugar, orange juice and zest, cloves, salt and pepper.

My preferred method of zesting is with a Microplane and I always do the entire fruit even if I need less.  Zest freezes well in zip top bags or you can combine it with any extra juice and put it in ice cube trays.  Those are great dropped into water or iced tea.

 
You can use an actual tablespoon and try and measure out what you need for the recipe but I like my OXO mini measuring cup, less hassle.

 
The purple carrots sadly do not stay purple but they are still a pretty color.  I went ahead and put a little more of the orange zest on top and to my own plate I added a bit more cracked black pepper.

 
If you don't have access to fresh carrots you could definitely use the steam in bag kind. Microwave them, drain off any liquid and then add them to the saucepan and make the glaze.

 
Thank you so much to all the other bloggers who joined me for this year's #FarmersMarketWeek! Be sure to go give them some love by visiting them via the links down below!


Citrus Rainbow Carrots

Citrus Rainbow Carrots
Author: Jolene's Recipe Journal

Ingredients

  • 2 pounds medium rainbow or regular carrots, diagonally sliced
  • 3 tablespoons butter
  • 2 tablespoons sugar
  • 1-1/2 teaspoons grated orange zest
  • 2 tablespoons orange juice
  • 3/4 teaspoon salt
  • 1/4 teaspoon pepper
  • 1/8 teaspoon ground cloves

Instructions

  1. Place carrots and enough water to cover in a large saucepan; bring to a boil. Reduce heat; cook, uncovered, until tender, 8-10 minutes. Drain; return to pan.
  2. Add remaining ingredients. Cook over medium-high heat until carrots are glazed, 2-3 minutes, stirring occasionally.
Carrots, orange, glazed
Side dishes, vegetables
American


  • Basil Pesto Hummus by The Spiffy Cookie
  • Caramelized Onion Quiche by Art of Natural Living
  • Citrus Rainbow Carrots by Jolene's Recipe Journal
  • Dolly Parton's Coleslaw by Palatable Pastime
  • Easy Tomato Tart by Our Good Life
  • Fresh Mango Salsa by Karen's Kitchen Stories
  • Honey Butter Skillet Corn by Cheese Curd In Paradise
  • Instant Pot Applesauce by Blogghetti
  • Pearl Fruit Platter by Magical Ingredients
  • Black Forest Icebox Cake by A Kitchen Hoor's Adventures
  • Spinach and Feta Frittata by Our Crafty Mom
  • Summer Cherry Ketchup & Barbecue Sauce by Faith, Hope, Love, & Luck Survive Despite a Whiskered Accomplice
  • Thai Basil Chicken by A Day in the Life on the Farm
  •  


    Comments

    1. Glazed carrots are always a welcome addition to the dinner table. These are gorgeous.

      ReplyDelete
    2. The rainbow carrots are gorgeous! I love your tips on freezing zest too!

      ReplyDelete
    3. Carrots and orange sound sound tasty. I haven't tried this combination and thanks for sharing this one.

      ReplyDelete
    4. Carrots aren't worth growing...from my experience. Even when they do well, they still don't do all that well. I prefer grabbing them at the farmer's market and making my life easier. These look yummy!

      ReplyDelete
    5. We are eating a ton of carrots right now so it’s exciting to have a new recipe. Love the color palette in this!

      ReplyDelete
    6. We don't eat carrots enough...I have to add this one to our rotation

      ReplyDelete
    7. Rainbow carrots are so fun! And I think carrots need to be celebrated more. They're so good and so underappreciated.

      ReplyDelete

    Post a Comment

    Popular posts from this blog

    Copycat Dunkin Donuts Egg White & Veggie Omelet Bites

    I'm a huge fan of the Dunkin Donuts Power Breakfast sandwich, so when I started seeing ads for the new Egg White & Veggie Omelet Bites I stopped in and gave them a try.  They were delicious, but of course, I knew I could make them at home.  I started with the whites of six eggs. You can use pasturized whites if you don't want to do the whole separating, finding a use for the yolks thing.  I beat them up with some salt and pepper.   Next up, the tomato and spinach.  I used grape tomatoes, seeded them and then chopped them into 1/4" pieces. I like baby spinach, and I took about 10 leaves and chopped those up into 1/4" pieces as well. I added that to the egg mixture.  When you pour it into the pans, be sure that it all gets evenly distributed. They bake up pretty quickly, around 9 minutes or so.  Dunkin gives you two egg bites, the mini donut serving size is three. I pop them in ziplocs in the fridge and just pull a bag and reheat them in the microwave for a quick

    Copycat Dunkin Donuts Bacon and Cheddar Omelet Bites

    Since I already came up with a version of Dunkin Donuts new Egg White & Veggie Omelet Bites for myself, I decided to make the other variety that they are offering, Bacon & Cheddar, for my husband. Super simple.  Beat up some eggs with salt and pepper.  Add in some shredded cheddar and a slice of bacon cut into 1/4" pieces (I used kitchen shears).  Bake them for about 9 minutes in sprayed mini donut pans. They baked up light and fluffy.  The bacon stayed crisp and there's just the perfect amount of cheese.   I split them up into portions in zip top bags and that way we can just grab a bag and warm them up. My husband laughed when I told him 3 is the serving size.  I'll definitely be doubling the recipe next time! Copycat Dunkin Donuts Bacon & Cheddar Omelette Bites Print With Image Without Image Author: Jolene's Recipe Journal Ingredients 4 large eggs 1/4 teaspoon salt 1/2 teaspoon pepper 3T shredded cheddar cheese 1 slice cooked bacon, cut in 1/4" piec

    Stuffed Waffles

    I wasn't sure I was going to blog these stuffed waffles since it was the first time I tried using the new iron but since I'd already taken the pics as I went I figured, why not? They aren't perfect but they are delicious! I'd seen videos floating around TikTok and Instagram of people making stuffed waffles so I hopped over to Amazon and ordered the Elite Gourmet version.  The instructions were fairly straightforward but there was no recipe so I made up a batch of Classic Waffle batter. Then I scoured the fridge for things to stuff them with.    First up, some leftover taco meat from the previous night and Fiesta blend cheese,  pepperoni and mozzarella cheese and lastly some strawberries and cream cheese.   For the taco stuffed I added the taco meat and cheese in the middle and then set out some salsa and sour cream to top them with.  Learning curve lesson 1- make sure your ingredients are all room temp before you start, they will bake much quicker.  For the pepperoni pi