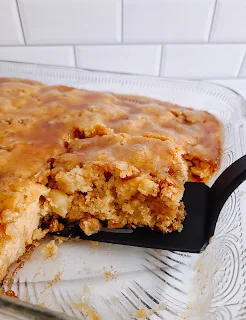
Fall is an amazing time in New England. To me, the season kicks off when I see that first notification that honeycrisp apples are ready. It's like Christmas morning! I went through the recipes I'd earmarked to try and decided on Glazed Apple Maple Blondies from Taste of Home.
This one comes together quickly. If I'm prepping a lot of apples I'll break out the KitchenAid Spiralizer but for this I just used my Titan hand peeler. It's 20 years old and it works just as well as the day I got it. The recipe didn't specify size, so I cut my apples into 1/2" dice.
Instead of a metal pan, I used a 13x9 glass pan and coated it with nonstick spray before I poured the batter in. It took about 45 minutes for it to test with some soft crumbs clinging to the toothpick.
I made the full glaze recipe with another of my New England staples, real maple syrup. I do not believe pancake syrup would give the same results.
It is a lot of glaze. I probably used about a little over half of it on the cake. I poured it over and then tipped the baking dish so it covered the cake completely.
The rest I dipped apple slices in and put in the fridge. You could also store the remaining glaze in a heat safe jar and refrigerate it. It would be great poured over ice cream.
I always read through the reviews before I attempt the dish. The reviews had a common theme on this one: Delicious, but they aren't really blondies. I have to agree, they are definitely more like cake.
No matter what you call them, the delicious part still holds true! Thank you so much to my fellow New Englander Heather B. for sharing her recipe!
Glazed Apple Maple Cake

Ingredients
- 1-1/3 cups packed brown sugar
- 1/2 cup butter, melted and cooled
- 1/2 cup maple syrup
- 2 teaspoons vanilla extract
- 2 large eggs, room temperature
- 2 cups all-purpose flour
- 3/4 teaspoon salt
- 1/4 teaspoon baking soda
- 3 cups chopped peeled Honeycrisp apples (about 3 medium)
- 1/4 cup butter, cubed
- 1/2 cup maple syrup
- 1/4 cup packed brown sugar
Instructions
- Preheat oven to 350°. Coat a 13x9 glass baking dish with nonstick spray.
- In a large bowl, beat brown sugar, melted butter, syrup and vanilla until blended. Beat in eggs, 1 at a time, beating well after each addition.
- In another bowl, whisk flour, salt and baking soda; gradually beat into brown sugar mixture. Stir in apples (batter will be thick).
- Transfer batter to prepared pan. Bake until top is golden brown and a toothpick inserted in center comes out with moist crumbs, 40 to 45 minutes.
- Meanwhile, in a small saucepan, melt butter over medium-low heat; stir in syrup and brown sugar. Bring to a boil over medium heat; cook and stir until slightly thickened, 2-3 minutes. Remove from heat; cool slightly.
- Pour glaze over warm cake. Cool completely in pan on a wire rack.
Notes
If using a 13x9 metal pan, line with parchment, letting ends extend up sides.


Cake...blondies...still looks amazing! And I agree, the maple syrup sounds way better than pancake syrup! Happy Fall!!!
ReplyDeleteApple cake is one of my very favorites. Love the addition of Maple to this recipe. Thanks for sharing Jolene. Honeycrisp are definitely the best.
ReplyDeleteThat glaze! The maple! And I bet those apples keep the cake super moist.
ReplyDeleteJolene this apple cake look absolutely scrumptious! Love the hint of maple in this recipe, I will try this soon. It looks moist and delicious!! Happy Fall to you!! 🍎
ReplyDeleteI have some apples I need to use up. Sounds like dessert this week! It looks delicious.
ReplyDeleteI went a little nuts at the fruit stand so this tasty looking cake has come at a perfect time!
ReplyDelete